Monday, December 9, 2013

Several New Projects

I have been busy lately and have not taken the time to post much.  So, here is a post with pictures of the projects that I have been working on.  Notice that I have been building light box frames for most of my art lately.
Salt Lake Temple with flowers
Bountiful Temple
Stained Glass Nativity
Manti Temple made to go into a door.
Same Manti temple with light coming through
Stand for the Nativity that comes apart for storage.


Thursday, June 27, 2013

Two Tools In One: Stained Glass


I have been working a lot on stained glass lately and thought it might be helpful to show you how I have made my glass cutting more efficient.  I do this by taping my grozer pliers to my glass cutter.  Now this only works with the pistol grip pliers, but I like it a lot.  It only took me a few minutes of using them together like this and I was hooked.  I don't see them as two tools anymore, I go from cutting to nipping with ease and without even thinking about it.

No more dropping one tool to pick up the next, and then dropping that one to go back to the first.  This trick has saved me lots of time and probably some arthritis.  I know it has saved my ears.  All that tool dropping can get loud.

I used blue painting tape because I just wanted to see if it would work and wanted to be able to peel it off if it didn't work well.  Apparently it works great because it has been over a year of using the tools like this and I haven't even thought of replacing the tape.

Try it out and let me know how it works for you.  If you are an entrepreneur and are able to fabricate something like this into a single tool, go ahead, by all means, do it.  But, please send me a pair, cuz remember folks, you saw it here first. 

Monday, April 8, 2013

Finishing up the Light Clay Wood Chip


Here is a video update of the shed.  Winter and other projects and responsibilities have slowed down the progress of the shed, but I have been working more on it lately.  I am just about done with the light clay wood chip infill, and am getting ready for the plaster.  This weekend we installed the door and started putting up the chicken wire over the pallets in preparation for the plaster.

Looking back on this project, I have decided that it has taken A LOT OF WORK!  This way of building is not for the faint of heart.  Some of the painstakingly time consuming things I have done so far are:

  1. The foundation:  stone by stone trying to save as much mortar as possible by fitting each rock neatly within the wall.  Usually masons will slop on a large wad of mortar and roughly fit the rocks together.  It takes much less time, but uses about twice as much mortar.  I used 15 bags.  Even easier would have been to pour cement footings.  The way I did it saved me money, and used up a pile of rocks and used cement curbing dumped in my yard by my neighbor (dumped before I bought the lot[he did insist on taking care of the pile, but I told him I had a use for it])
  2. Salvaging the materials:  I spent hours dumpster diving looking for useful materials. Then, when I got them, I usually had to take out nails, cut of bad parts, or reinforce sections.  Pallet wood is tough and ornery.  The nails don't come out easily, it is hard to cut, and never straight.  
  3. The light clay wood chips: Even though I used a cement mixer this process took forever.  We dug by hand a hole big enough for our trampoline to get enough clay.  We found that the term "light clay wood chips" isn't really "light" at all.  When you try and use a light clay slip to hold the wood chips together, they just become flaky when they dry out (even worse if they freeze while still wet).  It takes a lot of clay to keep the chips stuck together.  Our recipe ended up being something like 1/2 parts water, 1 1/2 parts clay, 1 part wood chips.  The end consistency ended up a lot like plaster.  In fact, I ended up using it much like plaster to patch holes.  That is another problem with the way I used pallets; There were many gaps that I missed while filling up the walls that I had to patch later.
Other time consuming things I have still waiting for me to complete include plastering both inside and outside and putting down the earthen floor.  The upside of both of these is that I will be using far less material to make both products.  The walls of the shed are about 10 inches thick and took a few tones of clay and wood to fill. I plan on putting just two coats of plaster on the walls, so they shouldn't take as much clay .  I will need to sift the clay better, but a good chunk of the plaster will be made of sand.

I am not saying that the methods I have employed are bad, but they are just more than I originally reckoned for.  When I am done, I will have a large, sturdy, environmentally friendly, warm, and comfy shed.  I think I'll turn it into my glass shop.

Wednesday, January 9, 2013

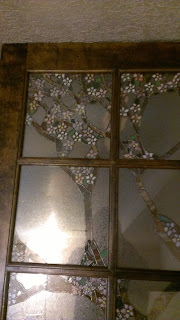
Stained Glass Cherry Blossom Door

 This is a Stained glass door that I finished a little while ago.  It is one of three doors we salvaged that had been stored in an old barn.  The owner of the barn found them in there as he was getting ready to tear it down.  He doesn't know how old the doors are, but expects them to be quite old.  We refinished this door and decided that I should put in stained glass.  I looked around and decided that I liked the cherry tree in blossom idea.  So, I drew up the design in Google Sketchup and had the local print shop print them out to scale.
 The project took me several months to complete with many, many hours on the job.  The door has about 1200 pieces.  We decided that this door would be our bedroom door and the other two doors would be the entry doors of our straw bale house we are going to build.  The other two doors will have side light windows which will be included in the design and add another five panes of glass.  Because this is meant for the bedroom, all of the glass is opaque.
 These pictures really don't do the door justice.  We are storing the door in the basement where there isn't good light.  Plus, these are tall doors and the ceiling is too short to stand the door upright down there, so the  pictures are a little off, but the door really is stunning to look at.
This was my first stained glass installation.  So far everything else I have done has been for hanging up in windows or put in picture frames.  On this window I had to buy glass panels to put on either side of the stained glass and basically make a triple glazed window.

 Now that this one is finished, I need to start on the other two.  They will both be basically the same pattern expanded for the side light windows.  I have made a few design changes which will make them even better.
 Once I have the doors installed, I'll post pictures and maybe a little video so you can see how awesome they really look.