Well, we just finished our new bathroom and one of the main features we put in is a tiled floor. The greatest part of the floor is the recycled glass accent tiles that I made. Recycled glass tiles aren’t easy to make. The first problem I encountered is that glass must be compatible to fuse two or more pieces together. When the glass pieces are compatible they will fuse together with a strong bond similar to a metal weld. When they are not compatible it can produce cracking in the final product. Sometimes no cracking happens at first, but the piece can be a ticking time bomb waiting to happen; one day the glass will just crack for no apparent reason. Glass bottles are basically never compatible. They don’t have to be because who is ever going to fuse them together? Bottle companies are only concerned with making consistent bottles. Even bottles from the same company but different batches may not be compatible. Art glass is formulated specifically so that it is compatible with other glass within a system. For example, Bullseye glass company makes a lot of glass that all plays nicely together so you can use it all together and never worry about compatibility.
The way to get around incompatible glass is to crush the glass into powder before mixing it. What this does is decrease the size of the particles. Mixing the different types of glass congruently produces even stress throughout the piece basically eliminating any stress fractures.
So, here is the process:
1. Clean the bottles. No glue, plastic, labels, or metal tops.
2. Smash the bottles onto small pieces.
3. Run the glass through a GARBAGE DISPOSAL.
4. Make sure you have all of the proper safety equipment and don’t breathe this stuff in.
5. Mix different colors of glass to produce the tile color you want.
6. Fill your molds with the mixed powder.
7. Fire the molds in the kiln.
See the following pictures of the process. This was my very first attempt at tile making. I have refined the proccess much more than this. For example: I now pack the kiln as full as I can get it to save energy.

Yellow Green glass powder in a mold

Blue glass powder in a mold

Crushed blue glass in a rectangular mold... all from the same type of bottle

Light blue glass in square mold

All four molds on the kiln shelf

I had extra room, so I decised I would try and flatten a piece of broken bottle.

Fired glass tiles. Notice the dark blue tile in the middle. It was contaminated with paper from the label and turned blackish
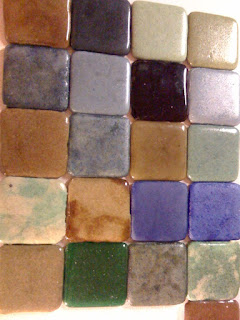
A mixture of finished tiles with varying colors. This time the dark one is actually brown... it's hard to tell in the picture.
.jpg)
This is the finished floor with the various colored tiles between regular ceramic tiles. I love the effect.
Wow! I have to say that I am really impressed! I've never even thought it was possible to make your own glass tile, but now I have the strange urging to go ahead and try it myself, even though I don't know anybody with a kiln... Oh well, thanks for the tutorial anyways!
ReplyDeleteLove this! I just happened upon your blog. I too am glass crazy! I Have lots of questions What temp. do you fire the tiles? Did you make your own molds for this or purchased them? The biggest questions? How do you run them though a garbage disposal? I am assuming this is not in your kitchen sink! Hahaha! If you don't mind I would love to know the answers to these questions?
ReplyDeleteI fire the tiles at about 1550F. I have had some problems with devitrification at that temperature, so if that happens to you, try a little bit lower. I purchased some bisque sushi dishes from the local ceramics store and put a shelf primer on them to use as molds. The garbage disposal works great. I bought a used sink from a thrift store, made a 2x4 frame for it to sit on and was able to find a garbage disposal for cheep at a damaged freight store. You just break the glass so that it will fit down the sink (small bottles fit in whole)and the glass comes out the bottom. I wear a mask, gloves and goggles when I do it. I have a bucket with a lid that I cut a hole into for the glass to fall into. I usually have to screen the glass to get the different sized particles I want.
ReplyDeleteGlass mosaic tiles are not cheap to buy and you have to invest in replacing and repairing them. Thanks!
ReplyDeleteHi Matt - it's been a few years since you made and installed these - any comments on how they're holding up? Also, I'm wondering whether it would be feasible to create 6" x 12" tiles to install on a 10ft long x 8ft high wall, part of which is used for a sink backsplash. I have a few months and I was thinking maybe a could get a small kiln and fire a tile a day (I don't know how long it takes to fire one). What do you think - is that possible or a ridiculous amount of effort? Thanks!
ReplyDeleteI have seen tiles that size made and it shouldn't be a problem. You will just have to find a mold that is the right size. We moved away from that house, so I don't know how they are doing now. I'm guessing that they are holding up just fine. We never had any problems while we were there in that house. Good luck with the project.
Delete