Showing posts with label All of Green Glass. Show all posts

Monday, October 17, 2011

Salt Lake Temple


It all starts with bottle glass that I have already melted flat.

Ever since people heard that I was going to make a stained glass Manti Temple they have been asking me to do a stained glass Salt Lake Temple.  Well, I finally got around to doing one.  My brother Danny was recently married there, so I decided that as a wedding gift I would make them one.  They were married in June, but I got a new job working for Snow College which required that we all move down to little old Ephraim.  This is something that we have been dreaming about ever since we left Snow College as students.  Sadly we had to leave our amazing garden behind, but it will give us the opportunity to build a new home on some bigger property and put in an even more amazing garden.  It also meant that there was no way that I could finish the temple in time, so it is now a Wedding/Christmas present.  With this piece, I was able to document the process a little better with more pictures.  So here are a few more pictures than usual.

 
This is the dorm room the college set me up with before my family moved down.  I turned it into a temporary glass shop.

Here I am cutting the blue glass for the sky.  You can see that using recycled bottles leaves a lot of "unusable" scrap.  I manage to use most of it in other projects.

Here you can see that I have started laying out the sky pieces ontop of the template.  They haven't been ground yet so they still have the patern paper glued on..
 

Now that they have been ground to the
 right shape the paper patern has been removed.

Finished the sky and working on the trees.  The greens are also recycled bottles.


Finished up the trees and starting the temple.  The gray glass had to be bought because there are no gray bottles.

I started putting the copper foil on before everything was cut out because I can watch movies and foil at the same time.

Here is the temple all cut out and about half foiled.  I ran out of foil and had to go to Salt Lake to get more. The tan glass was also bought for the same reason as the gray.

Starting to solder.  I think it looks a lot better with solder on it.  The solder hides a lot of the small mistakes.


Finnished solderingthe front side.  I have to be extreemly carefull flipping it over to solder the back side.

Soldering the back side.  The back ususlly goes much faster than the front because I don't have to be constantly checking that the pieces are straight.  Before they are soldered together the peices like to wiggle around a little.
 
Close up of the focal point Angel Moroni

Close up of the western spires.


Friday, January 21, 2011

Christmas Presents

A little Late, but here are some of the projects I did for Christmas.  As always, you can click on the pictures to enlarge them.

Stained glass Mickey Mouse


This Mickey was for my boss who is a huge fan.  100% recycled glass.


Stained Glass Humming Bird and Iris
 These two were requests.  I had made these two before and gave them to my Mother in Law who hung them up in her classroom at school.  This time they were made for someone who saw them in the window and wanted me to make them one as well.  Both are 100% recycled.


Stained Glass Joseph
 Here is Joseph for a stained glass nativity.  About  80% recycled glass and 20% reclaimed glass.


Mary & Jesus for a Nativity

 Here is Mary for the stained glass nativity. She is also about 80% recycled glass and 20% reclaimed glass.


The "complete"  Nativity

 Here is the whole family together just after opening on Christmas day.  I actually made two of these Nativity sets.

Tuesday, December 14, 2010

Recycle, Reuse, Reclaim, Salvage, Upcycle: Words to Live By

Because I am pretty new to selling glass art, I have been checking out other people’s stuff online to see what they are making and how much they are selling it for. I have seen a lot of cool stuff out there, but I have come to the conclusion that people need to use a dictionary when they are describing their glass art. So in this blog entry I will attempt to define several “green” terms that are commonly misused or misunderstood. Whenever you see my description of my glass products, you will know that I follow closely the following definitions:

Recycle – Recycling is the process of reclaiming materials from used products or materials from their manufacturing and using them in the manufacturing of new products. -sustainabilitydictionary.com

"Bones"- left over edges from flattened light sconces
 When a plastic bag is recycled into a new plastic bag, it is melted down and reprocessed into a new bag.  It may not be the same color, size or other similar characteristics to the original bag. It may have even been changed into something completely different than a bag like plastic car paneling, or polar fleece. When I recycle glass it means that I take old used glass and change it into a new object. When I make stained glass out of bottles, I first cut the bottles, then fire them in my kiln, then cut them to shape and assemble them into the stained glass piece. When I make tiles, I crush the bottles into powder and then fire them into molds in the kiln. Some of my recycled glass jewelry is made by simply cutting out patterns from bottles or vases and using just that bottle or pattern in the jewelry.

Reuse – noun 2. the act or process of using again. - Dictionary.com
“Often, the most sustainable option is to reuse materials and objects already manufactured, either for their original or new purposes, rather than recycle them into other products. This decreases further energy and materials use in recreating them into a new form.“ -stainabilitydictionary.com

People will often reuse bottles or vases by gluing, cementing, or painting objects onto them. The glass objects retain their original form, but are just decorated. The bottle does not undergo any major changes or processing.

The temple was made from recycled light sconces, but the
 sky was made of salvaged glass a lady was getting rid of.
Reclaimed – verb 2. to recover (substances) in a pure or usable form from refuse, discarded articles, etc. -Dictionary.com

Reclaimed means it has already been thrown away. Objects may be reclaimed to either be recycled or reused.

Salvage - noun 2. the act of saving any goods or property in danger of damage or destruction -Dictionary.com

Salvage may or may not have been thrown away, but without intervention would otherwise be destroyed.

Bottle bottom boxes are upcycled because the new
product is deffinitly worth more than hte original bottles
they are made out of.
  Upcycle - The process of converting an industrial nutrient (material) into something of similar or greater value, in its second life. sustainabilitydictionary.com

Upcycle is a new phrase that I have seen used for items that are both recycled and reused. I believe that to be upcycled the object should be worth more after the alterations have been made.


Tuesday, December 7, 2010

Recycled Glass Ear Rings

It’s about time I posted again.  I have been very busy lately.  We had a craft fair at the local Elementary School, and four different stained glass Christmas presents I’ve been working on.  Because some of the recipients of those presents read this blog, I will not be posting pictures of them for a little while yet.  Instead I have a few pictures of some of the ear rings we sold at the craft fair.  I have to admit that these are some of the worst pictures I have ever taken.  They were taken with my iphone and I’m pretty sure the lens was smudged, probably by one of my snot nosed kids.


Some of these were sold at the fair and we still have some left.  If any of you are interested in buying some, I'm selling them at $15 per pair.  The hooks and wire are sterling silver.  These are made by cutting cross sections from bottles and then fire polishing them in the kiln.  I have many more of these in a variety of colores.  If you want something specific I can make them to order, just let me know what you are looking for.  Shown here are the more symetrical and matching sets if you want to see some of the more funky looking rings, just let me know.  Also, I am planning on taking more pictures with my "real " camera.  Starting with the new year these and many other products will be showing up on Etsy.  When that happens, I'll write another post to let you all know.


Thursday, November 4, 2010

Bottle Bottom Boxes

The first Bottom Bottle Box
Made from a couple of Whole Foods spice jars
I received a case of empty Bombay Sapphire Gin sample bottles. Probably the kind you might find in hotels and airlines. They are tiny. They are too small to melt for stained glass, so I decided to slice them up into little square rings to be melted for jewelry. After slicing several bottles up, I had a stack of left-over bottle bottoms. I took them inside and told my wife that we should try and come up with something to do with them. I left the stack of bottle bottoms on the table and went back out to the shop for a minute. When I got back, guess what, the kids had found them and started to play with them (doesn’t that always happen?) What they were doing was making little boxes out of them by placing one on top of another upside down. With a little experimentation, the Bottle Bottom Box was born.


Frosted glass adds a nice touch

I am still having a hard time with the hinges. There are no hinges in the stores small enough to work on the boxes, so I am making my own with old copper wire that was pulled out of a remodel job. They work fine, but I’m still experimenting with them. Right now I am trying several different bottle sizes and styles to see what people like. I have already given away a couple as birthday presents. I’m sure I’ll be making many more of these in the future.

Multiple sizes are available

Tuesday, October 26, 2010

Manti Temple

Stained Glass Manti Temple


Trees in front of the temple
I finally finished it!  After a long and time consuming marathon of stained glass, I was finally able to finish the stained glass picture of the LDS Manti Temple.  This beauty took over 80 hours of work, but I was able to get it done in about a month.  The temple is made of light sconces I melted flat, the windows, roof, and trees are also recycled bottles I melted flat.  The sky and grass are made of salvaged stained glass I bought.  Even the frame is made of salvaged molding. 


Manti Temple west tower with light rays

This is by far the biggest, most difficult, and most rewarding piece I have made so far.  It has just over 500 pieces in it. 
Unfortunately there is no income off of this one; it was a wedding present for my brother-in-law and his new wife…they had better like it ;)  I hope to be able to start making more large pictures like this one soon.


Thursday, May 13, 2010

Working without a work shop

I haven’t been able to work much on my glass lately because my work shop is overrun with construction debris. Besides remodeling the bathroom, we split the family room to include a new bedroom. So, all of the family room furniture is in the garage (aka work shop). So I am limited to working on small, less messy projects in side. This usually means stained glass projects. The latest projects were for Mother’s Day gifts. 100% of the glass in these projects was recycled in one way or another. If you look at the pictures of some of the pieces you will see a variety of colors and a few different types of clear. The colored glass all comes from bottles I collected. The process goes as follows:

1. Collect the bottles. I have a few sources, but it is always difficult to find a variety of colors. Some colors are easy to find like green, brown, and clear. Blue and black are less common, but I can get them pretty regularly. Reds, bright yellows, orange and purples are much more difficult to find. I usually find them at thrift stores in the form of vases.

2. Clean the bottles. Remove the labels and any crusties that might be lingering.

3. Cut the tops and bottoms off. I use a tile saw with a special glass blade. The bottoms get crushed into powder for other uses and the necks get sliced into little rings for jewelry.

4. Cut the remaining body of the bottle in half vertically to make two half cylinders.

5. Clean all the leftover residue off.

6. Place the half cylinders in the kiln concave side up.

7. Fire the kiln and melt the half bottles flat.

Quite the process! However this produces wonderful flat glass that is perfect for making stained glass projects.


Wednesday, March 24, 2010

Crushed Glass Tiles

Crushed Glass Tiles


Well, we just finished our new bathroom and one of the main features we put in is a tiled floor. The greatest part of the floor is the recycled glass accent tiles that I made. Recycled glass tiles aren’t easy to make. The first problem I encountered is that glass must be compatible to fuse two or more pieces together. When the glass pieces are compatible they will fuse together with a strong bond similar to a metal weld. When they are not compatible it can produce cracking in the final product. Sometimes no cracking happens at first, but the piece can be a ticking time bomb waiting to happen; one day the glass will just crack for no apparent reason. Glass bottles are basically never compatible. They don’t have to be because who is ever going to fuse them together? Bottle companies are only concerned with making consistent bottles. Even bottles from the same company but different batches may not be compatible. Art glass is formulated specifically so that it is compatible with other glass within a system. For example, Bullseye glass company makes a lot of glass that all plays nicely together so you can use it all together and never worry about compatibility.

The way to get around incompatible glass is to crush the glass into powder before mixing it. What this does is decrease the size of the particles. Mixing the different types of glass congruently produces even stress throughout the piece basically eliminating any stress fractures.

So, here is the process:

1. Clean the bottles. No glue, plastic, labels, or metal tops.

2. Smash the bottles onto small pieces.

3. Run the glass through a GARBAGE DISPOSAL.

4. Make sure you have all of the proper safety equipment and don’t breathe this stuff in.

5. Mix different colors of glass to produce the tile color you want.

6. Fill your molds with the mixed powder.

7. Fire the molds in the kiln.

See the following pictures of the process.  This was my very first attempt at tile making.  I have refined the proccess much more than this.  For example: I now pack the kiln as full as I can get it to save energy.


Yellow Green glass powder in a mold

Blue glass powder in a mold

Crushed blue glass in a rectangular mold... all from the same type of bottle

Light blue glass in square mold

All four molds on the kiln shelf

I had extra room, so I decised I would try and flatten a piece of broken bottle.


Fired glass tiles.  Notice the dark blue tile in the middle.  It was contaminated with paper from the label and turned blackish
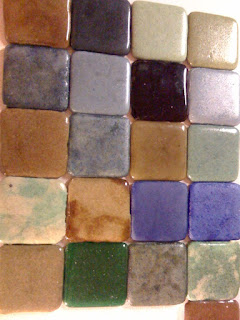

A mixture of finished tiles with varying colors.  This time the dark one is actually brown... it's hard to tell in the picture.


This is the finished floor with the various colored tiles between regular ceramic tiles.  I love the effect.

Tuesday, March 23, 2010

The is the maiden voyage of the All of Green Glass blog, a blog set up to feature my recycled glass products as well as the journey both the glass and myself go through to create recycled glass art.

How I got started.
I have always been eco conscious and I love making things with my hands. I have always had a childhood fascination with glass blowing tucked in the back of my mind. When my frugal wife stated that she was interested in making her own jewelry, I decided to get her all the things she needed to get into the hobby for Christmas. Knowing very well that without the correct equipment and materials the hobby would be a waste, I started looking online at the myriad or beading supplies offered. This is when I came across Lamp Worked Beads. After several YouTube videos, I learned of the process of making Lamp Worked Beads. Colored rods of glass are heated by a torch and wrapped around a metal rod to form beads. Different colors can be used and there are a slew of techniques available to make a variety of unique designs and an unlimited number of one-of-a-kind beads. I was immediately hooked. My first attempt of making glass beads was by using broken glass bottles and using Grandpa’s acetylene torch. Needless to say it wasn’t that easy and the outcome was less than desirable. However, amazingly, I did make some passable glass beads. After watching several more videos online along with hours of online reading, I learned how real glass artists do it. So, along with buying several hundred dollars of beading supplies for my wife I bought myself bona fide lamp working supplies. Although I worked with “real” store bought glass for several years with much enjoyment, it was less than coincidence that those first beads were made of recycled glass. While most glass artists shun the use of “incompatible” glass I have since found several techniques that I can employ to make good use of recycled glass. I hope you take the time to check out my other posts where I discuss some of these techniques as well as the art created by using them.