Showing posts with label reclaimed. Show all posts

Wednesday, January 9, 2013

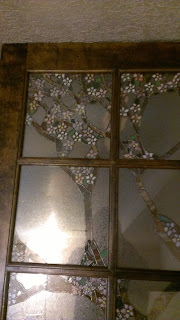
Stained Glass Cherry Blossom Door

 This is a Stained glass door that I finished a little while ago.  It is one of three doors we salvaged that had been stored in an old barn.  The owner of the barn found them in there as he was getting ready to tear it down.  He doesn't know how old the doors are, but expects them to be quite old.  We refinished this door and decided that I should put in stained glass.  I looked around and decided that I liked the cherry tree in blossom idea.  So, I drew up the design in Google Sketchup and had the local print shop print them out to scale.
 The project took me several months to complete with many, many hours on the job.  The door has about 1200 pieces.  We decided that this door would be our bedroom door and the other two doors would be the entry doors of our straw bale house we are going to build.  The other two doors will have side light windows which will be included in the design and add another five panes of glass.  Because this is meant for the bedroom, all of the glass is opaque.
 These pictures really don't do the door justice.  We are storing the door in the basement where there isn't good light.  Plus, these are tall doors and the ceiling is too short to stand the door upright down there, so the  pictures are a little off, but the door really is stunning to look at.
This was my first stained glass installation.  So far everything else I have done has been for hanging up in windows or put in picture frames.  On this window I had to buy glass panels to put on either side of the stained glass and basically make a triple glazed window.

 Now that this one is finished, I need to start on the other two.  They will both be basically the same pattern expanded for the side light windows.  I have made a few design changes which will make them even better.
 Once I have the doors installed, I'll post pictures and maybe a little video so you can see how awesome they really look.

Wednesday, October 17, 2012

A poor video of me putting light clay wood chips in the wall


I know I need to work on my video technique, but I was also working at the time and it is hard to pay attention to both where the camera is pointed and what you are doing while slopping mud.  I just wanted to show what it is like using light clay wood chip.  From the video you can see that the clay isn't too light.  It definitely isn't cob, but we found that if we didn't have enough clay in the mix, the small wood chips wouldn't stick together very well.  The first few batches we did had about the same recipe as light clay straw, but with wood chips replacing the straw.  The results of those first batches were unsatisfactory and the walls started flaking off wood chips when they were rubbed.  With more clay in the mix, it makes it less insulative, it has  more thermal mass, and it is much stronger.

Thursday, July 12, 2012

Building a Shed

Image of the Google SketchUp Model

Started collecting pallets and rocks
spreading out the rocks
This project has "Crazy" written all over it.  First of all the reason behind it.  Our son has autism and qualifies for services such as SSI, DSPD, and Medicaid.  There are several requirements to be able to quaify and one of those has to do with assets that we own.  One of the asset stipulations is that we cannot own property that we don't live on.  Well, back in December we bought some property to build our straw bale house on.  When we did that SSI put us on hold with their services for one year.  We figured that we could survive for a little while, but now the bild still hasn't started and we are being told that come December if we don't live on the property we will loose SSI.  Because the other programs are based off of our eligibility for SSI, we will loose them as well.  By the way there is a 4 year waiting list to get back on.  We have gone the rounds to try and find a solution, but it boils down to needing to move on the property while we build.  


The first day of foundation wall
Long story short, we just bought a camper trailer and I'm going to build a shed.  The purpose of the shed is to give us extra space to store things, a place to hang out and a place to eat together.  After the house is built, the shed will serve as my glass shop until I can build an official shop and then the shed will be a really cool hangout for the kids.Here is the link to the SketchUp model: http://sketchup.google.com/3dwarehouse/details?mid=f8e22fec33d9919499a2ba6ee90ca252


The corner at the right was the shallowest and everything after that took more rocks and a lot more time
The code here says that anything over 200 square feet needs a building permit, but anything under that doesn't, which also means that it doesn't need inspections.  So, I am going to build a pallet shed with an earthen floor, light clay straw/wood chips/foam insulation inside the pallets, a rocket mas heater, and an earthen plaster finish inside and out.  I was hoping to do all of this under $500.  The original plan was to use a living roof, but with the materials at hand the living roof would be too heavy, so I'll probably use a metal roof manufactured here in town instead.
That's me working
The foundation used a lot of stone and urbanite (used concrete) mortared together with a cement cap to make it all level.  Anchor bolts were put in between the rocks and mortared in.  The mortar cost $75, the cement $41, the rocks and urbanite came off the property $0 and the anchor bolts (and a lot of other materials for this little project) were salvaged from a dumpster $0. 


Trying to bring up the wall to the right level
 I have been able to find all of the 2x4 material, pallets, windows, door, joists for the loft, wiring, screws, trim, and carpet (for the loft) all through dumpster diving as well as some of the treated toe ups, and most of the plywood.  As we get further along I'll keep you up to date on what I have salvaged and what I have had to purchase.  The reasons we are trying to keep it cheep are 1) Duh who wants to spend extra money, and 2) we are trying to keep a good down payment for the construction loan for the real house.
First corner finished

This process takes a lot longer than just pouring a cement foundation
I spent hours doing this.  After sitting like this for a few hours , It would take me several minutes before I could stand up straight
Almost done with the foundation

A concrete slab to level off the top

Wednesday, January 4, 2012

Stained Glass Bountiful Utah Temple


This year for Christmas we had Sarah’s brother Joseph and his family to give presents to.  So, following the traditions of previous years, I made them a stained glass picture of the Bountiful Utah Temple where they were married.  I wasn’t able to use much recycled glass on this one, only the windows, but I was able to put to good use some of the wood floor we have been salvaging to use as a frame.  The floor boards are tongue and groove.  The stained glass fit nicely into the groove.  So, I sanded off the old paint, trimmed off the tongue side, routed an edge on it and turned it into a picture frame.


 Another innovation this piece has on it are a couple of female ends to chain locks.  I have been struggling to find a secure way to hang heavy stained glass on a wall and I hope this will finally be the solution.


 I bought an LED light bar from IKEA to mount on the back.  The problem is that there is n o sign at IKEA that says that when you buy an LED light strip, you have to buy a plug to go with it.  So, I don’t have any pictures with the light working.   In fact, I haven’t seen it work yet.  We sent the plug to them after the picture was delivered and haven’t had a chance to see the whole ensemble together.


Look Ma, no plug

Friday, December 16, 2011

Salvaging for a new home.

Free Toilets in good condition
These doors are solid wood from the early 1900s
We are officially getting ready to build our new house in Ephraim Utah. We are going to build a Straw Bale House, which will be the subject of several posts I’m sure. Because this blog is dedicated to sustainable living (recycled glass and gardening) I have decided to add the home construction in as well. Besides, right now there is a lot more going on with the house construction than there is with either of the other two topics. This entry will be dedicated to salvaging materials for the new house.


Here in Ephraim there are a few houses slated for demolition to make way for a new shiny parking lot. We were given permission to go in one of them (hopefully in the near future the other two as well) and take out anything we want. The house had already been picked apart by some other people, but we were able to salvage 10 doors, two toilets, several light fixtures, an armoire, the electrical breaker box and a few really old window frames as well as a few other odds and ends. Over all we have probably saved a couple thousand dollars towards the new construction. Next we are going to try and pull out the old wood floor and some of the cool old moldings.


These are the original windows from the house.  We found them in the root celar


The first batch of wood floor.  We will have to pull the nails and plane each peice before we can refinish it.


Another amaizing door knob

Thursday, January 27, 2011

Glass Color

People often ask me how I get my glass to be the right color. Some people ask me if I paint the glass or if I add chemicals to the glass. So I'm going to explain here about recycled glass colors. Let me first off say that even though I can often be found with a variety of liquor bottles in my possession, I don't drink alcohol. However, alcohol bottles are the most abundant type of bottle out there and come in the biggest variety of colors. That’s right; I get my colors from the bottles themselves.


There are a few ways stained glass gets its color. First of all normal glass is clear which is very convenient because it would be weird to look out of colored glass windows all the time. To get different colors of glass manufacturers add metal oxides to a batch of molten glass. Different metal oxides in different ratios produce the myriad of colors that you see in stained glass. These colors can range between opaque to clear, dark and light and everything in between. There are several companies out there that specialize in producing consistent colors for use in art glass.

This is a good time to talk about compatibility. The companies that make art glass usually try and make their glass compatible. This means that two different pieces will fuse together when heated and when they cool they will maintain a congruent, cohesive bond. Basically glass expands as it is heated and as it cools it contracts. Depending on the chemical makeup of the glass, i.e. the different metal oxides mixed in, the glass may expand and contract at different rates. If you try and fuse two pieces of glass that are not compatible, they will expand and contract at different rates and a cohesive bond will not form resulting in cracking and in extreme cases explosions. The trick here is to produce glass that is not only compatible, but also in a range of colors. The swirly colors seen in a lot of stained glass is produced in this way.

Bottle and window manufacturers don’t care if their glass is compatible with others, they only care if their glass finishes out structurally and visually sound. This is why people usually don’t fuse recycled glass; it just isn’t compatible. Because some of the metal oxides required to get certain colors are expensive (silver and gold for example) there are several colors that you will rarely see in “throw away” liquor bottles. Reds, yellows, oranges, and purples are rare in bottles and are usually reserved for art glass or more expensive containers and vases.

Another way glass is colored is by painting it with fuseable glass. If you look at stained glass in churches and see faces that look like they are painted it is because they are. Don’t be fooled into thinking that this is a cheap trick because it usually isn’t. Specially trained glass painters practice for years to learn to paint with enamels on glass. Enamels are basically powered glass. The artist will paint on the glass and then fire the glass in a kiln to fuse the enamel onto the glass. The end product truly is “stained glass” that won’t scrape off and can’t be washed off.

The last way glass is colored is by painting it with regular paint. This is the cheapest and worst way to color glass. Basically the glass is painted with normal paint, and that’s all. This kind of paint will eventually come off because there is no chemical bond to adhere it to the glass. If you were to put painted glass in a kiln it would burn of the paint and you will get a dirty clear glass as a result.

As a result of all this, I have a limited pallet of colored glass to choose from. Most of my glass comes from bottles including the ones shown here. (No, I am not endorsing any of them.) Sometimes I use different colored (usually white) light sconces. To get the hard to find colors I search the thrift stores for vases, plates, cups, etc. Everything I use has to be cut with my saw and then fired flat in the kiln before I can use it in stained glass.


Friday, January 21, 2011

Christmas Presents

A little Late, but here are some of the projects I did for Christmas.  As always, you can click on the pictures to enlarge them.

Stained glass Mickey Mouse


This Mickey was for my boss who is a huge fan.  100% recycled glass.


Stained Glass Humming Bird and Iris
 These two were requests.  I had made these two before and gave them to my Mother in Law who hung them up in her classroom at school.  This time they were made for someone who saw them in the window and wanted me to make them one as well.  Both are 100% recycled.


Stained Glass Joseph
 Here is Joseph for a stained glass nativity.  About  80% recycled glass and 20% reclaimed glass.


Mary & Jesus for a Nativity

 Here is Mary for the stained glass nativity. She is also about 80% recycled glass and 20% reclaimed glass.


The "complete"  Nativity

 Here is the whole family together just after opening on Christmas day.  I actually made two of these Nativity sets.

Wednesday, November 10, 2010

Garden Update

People have asked me to add more pictures to the blog and people keep asking about the garden, so I decided to do a follow up post about how our plants did this year with mostly pictures of vertical gardening.

 Here are the beans in front of the front window.  They cast a nice shade on the front of the house.  This system made them very easy to pick.


The beans grew all the way to the top of the strings and started looking for a place to keep growing


The pumpkins completely took over the pergola providing shade for the house and the hammock.  Check out how the pumpkins just hang there.  They didn't have any problems growing like that.  We didn't even have to support them.


 Another hanging pumpkin.  A couple of our pumpkins ripened really early.


The pumpkin seeds came from a pumpkin we had last year.  We planted 11 plants and grew 11 pumpkins.  Next year we will probably buy seeds to see if we can get more out of each plant.


Pumpkins on the roof.  Look at all that shade.  The vines didn't like growing on the black asphalt shingles.  They kept turning back towards the pergola and hanging down in the middle of the walkway.  I had to keep putting them back up on the pergola.


Here you can see the beans in front of the window, the pumpkin covered pergola with zucchini in the front as well as the salvaged countertop pavers.  The beans are sparse in the middle because a large rain storm came just after we planted washing away the seeds so many of the beans didn't germinate.


A view of the front yard from the street.  The tomatoes ended up growing well over the top of the t-frames.  We canned enough spaghetti sauce and ketchup for the entire year.