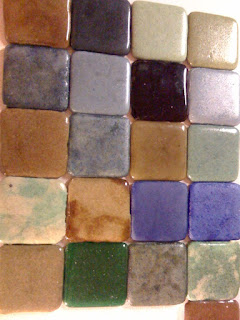
Crushed Glass Tiles
Well, we just finished our new bathroom and one of the main features we put in is a tiled floor. The greatest part of the floor is the recycled glass accent tiles that I made. Recycled glass tiles aren’t easy to make. The first problem I encountered is that glass must be compatible to fuse two or more pieces together. When the glass pieces are compatible they will fuse together with a strong bond similar to a metal weld. When they are not compatible it can produce cracking in the final product. Sometimes no cracking happens at first, but the piece can be a ticking time bomb waiting to happen; one day the glass will just crack for no apparent reason. Glass bottles are basically never compatible. They don’t have to be because who is ever going to fuse them together? Bottle companies are only concerned with making consistent bottles. Even bottles from the same company but different batches may not be compatible. Art glass is formulated specifically so that it is compatible with other glass within a system. For example, Bullseye glass company makes a lot of glass that all plays nicely together so you can use it all together and never worry about compatibility.
The way to get around incompatible glass is to crush the glass into powder before mixing it. What this does is decrease the size of the particles. Mixing the different types of glass congruently produces even stress throughout the piece basically eliminating any stress fractures.
So, here is the process:
1. Clean the bottles. No glue, plastic, labels, or metal tops.
2. Smash the bottles onto small pieces.
3. Run the glass through a GARBAGE DISPOSAL.
4. Make sure you have all of the proper safety equipment and don’t breathe this stuff in.
5. Mix different colors of glass to produce the tile color you want.
6. Fill your molds with the mixed powder.
7. Fire the molds in the kiln.
See the following pictures of the process. This was my very first attempt at tile making. I have refined the proccess much more than this. For example: I now pack the kiln as full as I can get it to save energy.

Yellow Green glass powder in a mold

Blue glass powder in a mold

Crushed blue glass in a rectangular mold... all from the same type of bottle

Light blue glass in square mold

All four molds on the kiln shelf

I had extra room, so I decised I would try and flatten a piece of broken bottle.

Fired glass tiles. Notice the dark blue tile in the middle. It was contaminated with paper from the label and turned blackish

A mixture of finished tiles with varying colors. This time the dark one is actually brown... it's hard to tell in the picture.
This is the finished floor with the various colored tiles between regular ceramic tiles. I love the effect.
 I found a recipe online for a homemade liquid stringer. Liquid stringer is glass powder mixed with a liquid agent that allows the glass to be squeezed out of a plastic bottle onto a sheet of glass. In my case I used Aloe Vera, the green kind used for sunburns. Mix the Aloe with powdered glass and a little water and fill squeeze bottles with the stuff. Then you can “paint” sheets of glass by squeezing out the liquid stringer. These pictures are some of the trials that we ran. I had my wife and 2 year old help me with the designs.
  They were fired to 1400F which left them the exact same shape they came out of the bottle with no slumping at all. Next time I will try 1450F to see if they will melt down a little. It does give a cool 3D effect.


.jpg)